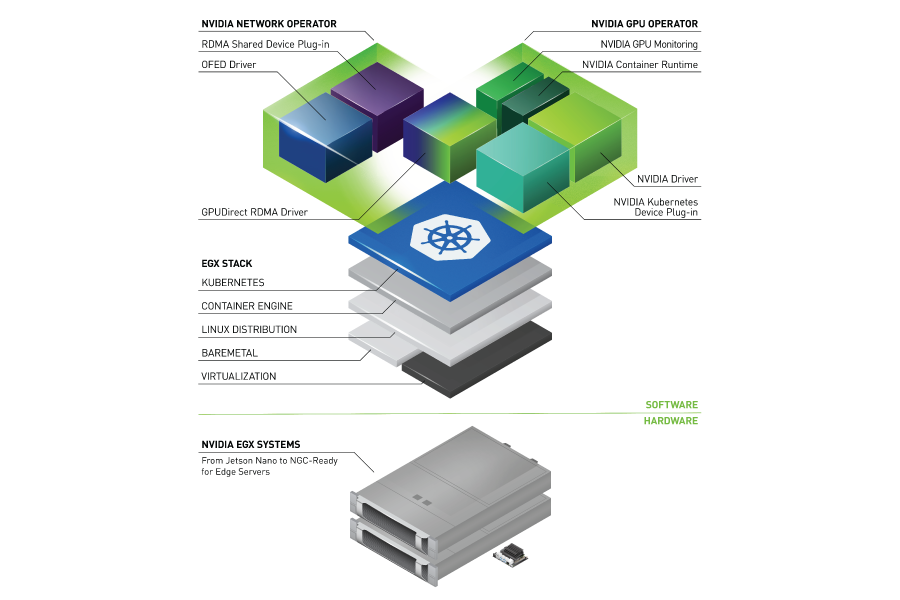

NVIDIA GPU Cloud (NGC) provides access to a number of containers for deep learning, HPC, and HPC visualization, as well as containers with applications from our NVIDIA partners – all optimized for NVIDIA GPUs and DGX systems. These downloadable containers execute their application without having to setup a custom environment with numerous dependencies, such as framework, libraries, and apps. Now NVIDIA has added Kubernetes to its containerization toolbox.
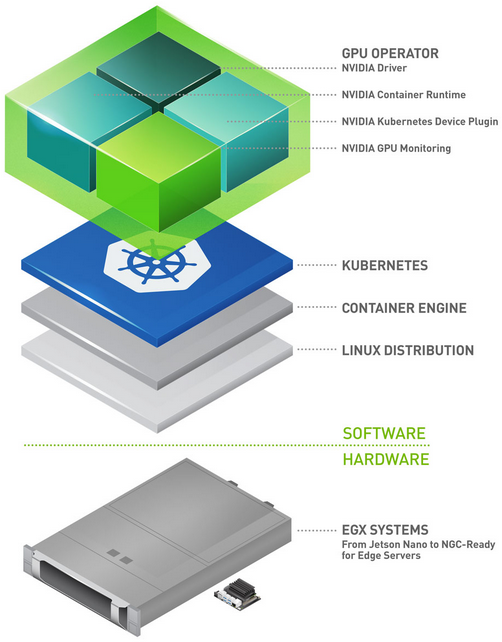
Leveraging other tools to help with provisioning and batch scheduling extends the power of containers, especially when you have multiple and/or shared resources. Kubernetes represents one such open-source tool adopted by many developers to help deploy, scale, and manage containerized applications such as those available from the NVIDIA GPU Cloud. Kubernetes’ schedule GPUs feature supports managing NVIDIA GPUs spread across nodes.
Getting Started with Kubernetes
This quick start guide demonstrates how to set up a Kubernetes environment to help your organization deploy and manage containers on single- or multiple-GPU system.
You need a system with at least one NVIDIA GPU and a CPU only system, though the CPU system can be a virtual machine (VM). You’ll learn about the following:
- Setting up a standalone Kubernetes master node without GPUs
- Setting up a GPU worker node with the updated NVIDIA Container Runtime for Docker on NVIDIA DGX Station
- Connecting to your NGC container registry account for NVIDIA GPU-optimized containers
As a minimum you need to be comfortable with the following:
- Administering Linux
- Docker, including knowledge of Docker networking
- Basic Kubernetes knowledge
We will use the kubeadm and kubectl CLI commands as the method for setting up and administering the Kubernetes environment for this particular install.
NVIDIA DGX Station running DGX OS Desktop version 3.1.6 will be used as the GPU worker node used in this guide.
Master Node Installation
This introduction uses a VM with two vCPUs, 8GB RAM, 64GB disk and Ubuntu 16.04 LTS for the master node. Newer OS versions should work with these instructions, but older versions of Ubuntu may be unsupported.
You need to disable swap for Kubernetes, which is a requirement for the Kubernetes section of the installation. If you inadvertently configure swap, you’ll see an error similar to the following during kubeadm init:
[preflight] WARNING: Running with swap on is not supported. Please disable swap or set kubelet's --fail-swap-on flag to false.
Installation Of Docker
First, you need to make sure Docker is up to date. (Please refer to the Docker documentation for more detailed instructions).
Before you begin, first check for any OS updates:
sudo apt update
sudo apt -y upgrade
Ensure the following packages (apt-transport-https, ca-certificates, curl, software-properties-common) are installed. Install them with if they are not present with sudo apt install apt-transport-https ca-certificates curl software-properties-common. Next, enter the following commands to install Docker:
curl -fsSL https://download.docker.com/linux/ubuntu/gpg | sudo apt-key add -
sudo add-apt-repository "deb [arch=amd64] https://download.docker.com/linux/ubuntu $(lsb_release -cs) stable"
sudo apt update
sudo apt install -y docker-ce
Installation Of Kubernetes
In this section, we show you how to install Kubernetes and initialize the master node with kubeadm. (Refer to installing kubeadm for more information). Issue the following commands to install Kubernetes:
curl -s https://packages.cloud.google.com/apt/doc/apt-key.gpg | sudo apt-key add -
curl -s -L https://nvidia.github.io/kubernetes/gpgkey | sudo apt-key add -
curl -s -L https://nvidia.github.io/kubernetes/ubuntu16.04/nvidia-kubernetes.list |\
sudo tee /etc/apt/sources.list.d/nvidia-kubernetes.list
sudo apt update
sudo apt install -y kubectl=1.9.7+nvidia kubelet=1.9.7+nvidia kubeadm=1.9.7+nvidia
sudo systemctl status kubelet
Checking “systemctl status kubelet” you will notice that the service has failed. This is expected behavior as the CA certificate has not been created yet. The certificate will be created during the cluster initialization.
The next command “kubeadm init…” initializes and configures your Kubernetes cluster:
sudo kubeadm init --ignore-preflight-errors=all --config /etc/kubeadm/config.yml
Take note of the output from the sudo kubeadm init --ignore-preflight-errors=all --config /etc/kubeadm/config.yml command. Look for the kubeadm join --token in the output as you will use this token to join all worker nodes (GPU or CPU) to the Kubernetes cluster.
Here is an example of a “kubeadm join –token” command, that is used to join worker nodes to the Kubernetes cluster:
kubeadm join --token 672601.5db1d8d05f0a9c14 192.168.2.95:6443 --discovery-token-ca-cert-hash sha256:f3ed02134f0043577dbb78395ea2a2cc2780e4f70d3c21798e17d69b12258474
Each token remains valid for only 24 hours. Starting with Kubernetes 1.9, the “kubeadm token create” command added the “–print-join-command” flag. If you need a new token, login to the master node and issue:
sudo kubeadm token create --print-join-command
Note that kubeadm looks for a configuration file named ‘config’ in the ‘.kube’ directory of the current users to know who is allowed to execute the command. To setup your user account to administer your Kubernetes cluster, issue the following:
mkdir -p $HOME/.kube
sudo cp /etc/kubernetes/admin.conf $HOME/.kube/config
sudo chown $(id -u):$(id -g) $HOME/.kube/config
Each and every Kubernetes cluster needs a Container Network Interface installed. We have chosen to use Flannel CNI for this deployment:
kubectl apply -f https://raw.githubusercontent.com/coreos/flannel/v0.9.1/Documentation/kube-flannel.yml
Refer to Installing a pod network in the Kubernetes documentation for more information as well as other networking options.
It will take a minute or two for the above commands to download and run the pod networking containers. Issue the following command to check the status in case you are waiting for the “Status” of the containers to all be “Running”:
kubectl get pods --all-namespaces
Your output should be similar to figure 1:
Check the following Kubernetes logs if you are having issues:
- Examine the “/var/log/syslog” file for Kubernetes related errors.
- Issue the “systemctl status kubelet” command to check the current state of the service.
- Issue the “journalctl -xeu kubelet” command to review the messages from the journal.
At this point, you should have a functional Kubernetes master node.
The Kubernetes master node does not have any installed GPUs in this environment. However, your master node could also be the NVIDIA DGX Station. If so, you will want to run jobs on the master node. Issue the following command to enable Kubernetes to allow local jobs to run:
kubectl taint nodes --all node-role.kubernetes.io/master-
If you are running Kubernetes as an all-in-one system deployment and you taint your DGX station so that master and worker node are a single system, you need to be aware of the following issue:
kube-dns keeps restarting #381 and/or Liveness probe for containers in Kube-DNS pod fails intermittently #408
DGX Station Worker Node Installation
Now that you have a Kubernetes master node setup, prepare your DGX Station to join the cluster. You will not need to install Docker on your DGX station since it comes pre-installed as part of the Base OS. You will, however, need to update and install some needed packages before joining your Kubernetes cluster. You must update the version of NVIDIA Container Runtime for Docker and install Kubernetes for NVIDIA GPUs. Now you are ready to join the DGX Station to the Kubernetes cluster.
If you want to issue Docker commands as a user (without sudo), add your user to the docker group with the following command:
sudo usermod -aG docker $USER
Logout and log back in. Then, from this point on you can execute any Docker command without “sudo”.
NVIDIA Container Runtime for Docker
The NVIDIA Container Runtime for Docker has been updated and is now the recommended way of running containers on DGX systems. For DGX systems follow the Upgrading to the NVIDIA Container Runtime for Docker process.
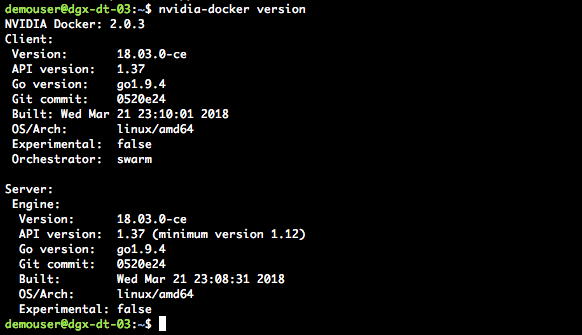
Once updated nvidia-docker version will look similar to the following:
Install Kubernetes On The DGX Station Worker Node
Now let’s install the Kubernetes components on the DGX Station worker node. This resembles what we did on the master node. However, instead of initializing the Kubernetes installation as a master node we will “join” the DGX Station worker node to the Kubernetes master node.
curl -s https://packages.cloud.google.com/apt/doc/apt-key.gpg | sudo apt-key add -
curl -s -L https://nvidia.github.io/kubernetes/gpgkey | sudo apt-key add -
curl -s -L https://nvidia.github.io/kubernetes/ubuntu16.04/nvidia-kubernetes.list |\
sudo tee /etc/apt/sources.list.d/nvidia-kubernetes.list
sudo apt update
sudo apt install -y kubectl=1.9.7+nvidia kubelet=1.9.7+nvidia kubeadm=1.9.7+nvidia
sudo systemctl status kubelet
Checking “systemctl status kubelet” will reveal that the service has failed. This is expected behaviour as the CA certificate has not been created yet. The certificate will be created during the cluster join command.
If you created your Master node over 24 hrs earlier you will need to create a new join token, login to the master node and issue the following to see if your “kubeadm init” token has expired:
sudo kubeadm token list
If the token has expired issue:
sudo kubeadm token create --print-join-command
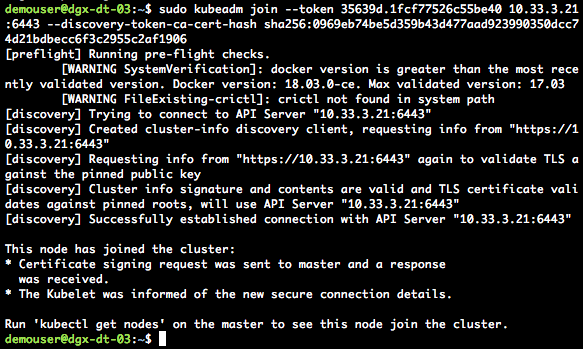
Using either the “token” obtained earlier in the master node “Installation Of Kubernetes” section or a newly created token on the DGX Station worker node issue a “kubeadm join” command on the DGX Station to join the Kubernetes Cluster:
# example join command, this token will not work for your installation,
you may have to create a new token if it has been longer than 24hrs since you
“sudo kudeadm init” the master node.

sudo kubeadm join --token e8c937.21e8470b7bff0fd5 10.33.3.21:6443 --discovery-token-ca-cert-hash sha256:752a095e73629a0b0fe7cd8c1da2e9e070511c8421ff4fe58d1e48b508e05e2f
You should see output similar to figure 3.
Check the following Kubernetes logs if you are having issues:
- Check the “/var/log/syslog” file for Kubernetes related errors.
- Issue the “systemctl status kubelet” command to check the current state of the service.
- Issue the “journal ctl –xeu kubelet” command to review the messages from the journal.
Now on the master node issue the following commands to confirm your Kubernetes installation:
kubectl get nodes
kubectl describe nodes
kubectl get all --all-namespaces
Review the output of the above commands. For “kubectl get all –all-namespaces” check the “Status” of the running containers, for “kubectl get nodes” check the “Status” of the nodes. For “kubectl describe nodes”, become familiar with the output.
NVIDIA GPU Cloud
In this section we will connect your newly installed Kubernetes cluster to the NVIDIA GPU Cloud and use an optimized GPU-enabled container. The NVIDIA GPU Cloud Container User Guide has all the information you need to get logged into NGC and covers how to obtain an API Key.
Login to NVIDIA Container Registry (nvcr.io)
Once you have your API Key, as an initial test on any one of your system issue “docker login” and provide the credentials. After the initial “docker login” has been established we can go ahead and perform a test using an optimized GPU-enabled container. The login prompts are as follows:
docker login nvcr.io
Username: $oauthtoken
Password: <your-api-key>
Once the login has been completed, verify that your Docker credentials have been updated:
cat .docker/config.json
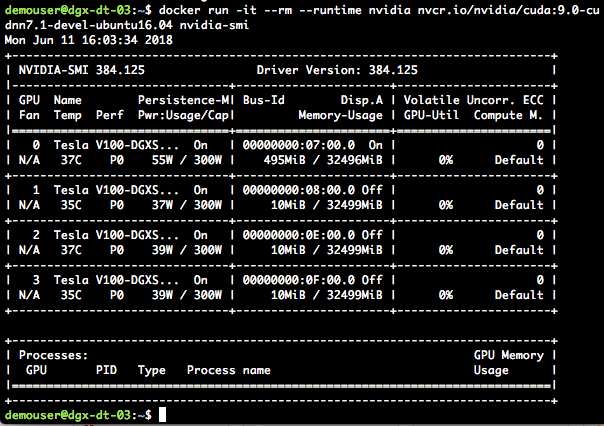
Confirm that the login works by a docker pull of the latest Cuda container image. At the time of writing this article the latest version is “cuda:9.0-cudnn7.1”:
docker pull nvcr.io/nvidia/cuda:9.0-cudnn7.1-devel-ubuntu16.04
Once the container image has been downloaded locally, run the container using the NVIDIA Container Runtime for Docker. Run the command nvidia-smi within the container:
docker run -it --rm --runtime nvidia nvcr.io/nvidia/cuda:9.0-cudnn7.1-devel-ubuntu16.04 nvidia-smi
Your output should be similar to that shown in figure 4:
Create Kubernetes login to NVCR.IO
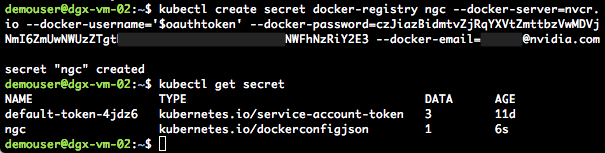
Using your NGC API Key you will create a Kubernetes “secret” on the master node, this secret enables Kubernetes to log into NGC and download an optimized GPU-enabled container when specified:
kubectl create secret docker-registry <your-secret-name> --docker-server=<your-registry-server> --docker-username=<your-registry-username> --docker-password=<your-registry-apikey> --docker-email=<your-email>
Use the following parameters in the above command:
- docker-registry <your-secret-name> – the name you will use for this secret
- docker-server <your-registry-server> – nvcr.io is the container registry for NGC
- docker-username <your-registry-username> – for nvcr.io this is ‘$oauthtoken’ (including quotes)
- docker-password <your-registry-apikey> – this is the API Key you obtained earlier
- docker-email <your-email> – your NGC email address
(Note: For more information, refer to Pull an Image from a Private Registry.)
Verify that the secret creation has completes:
kubectl get secrets
You should see output similar to figure 5:
Launching a Container though Kubernetes
Now you can use your very first optimized GPU-enabled container. Kubernetes uses the “.yaml” file format. (For more information on yaml files, refer to Understanding Kubernetes Objects). Let’s look at an example of a CUDA container that will run one time using the Kubernetes secret (called ngc) that we just created and will issue “nvidia-smi’:
apiVersion: v1
kind: Pod
metadata:
   name: cuda-ngc
   namespace: default
   labels:
      environment: dev
      app: cuda
spec:
   containers:
   - name: cuda-container
      image: nvcr.io/nvidia/cuda:9.0-cudnn7.1-devel-ubuntu16.04
      imagePullPolicy: IfNotPresent
      Args: ["nvidia-smi"]
      extendedResourceRequests: ["nvidia-gpu"]
   extendedResources:
      - name: "nvidia-gpu"
      resources:
         limits:
            nvidia.com/gpu: 1   # change value to appropriate number of GPU(s)
         affinity:
            required:
               - key: "nvidia.com/gpu-memory"
                 operator: "Gt"
                 values: ["8000"]   # change value to appropriate mem for GPU(s)
      restartPolicy: Never
      imagePullSecrets:
      - name: ngc   # specifying the secret/credentials to use when connecting to NGC
The creation of a container that hasn’t yet run will take a little longer since the required optimized GPU-enabled container image is pulled locally to the DGX Station worker node. On the master node create the “yaml” file, then issue the following commands to confirm the file is correct, then create the container, and lastly view the status of the container:
your-yaml-filename.yaml
kubectl create -f <your-yaml-filename>.yaml
kubectl get pods --show-all
You should see output similar to the following:

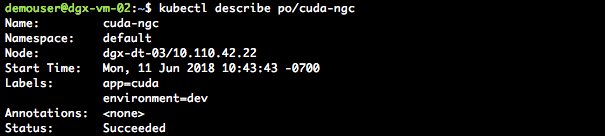
After the NGC CUDA container shows “Completed” status, “describe” the pod to see the steps performed by Kubernetes to run the requested container.
kubectl describe po/<your-pod-name>
Figures 7 and 8 show an example of what you will see after you describe the container:

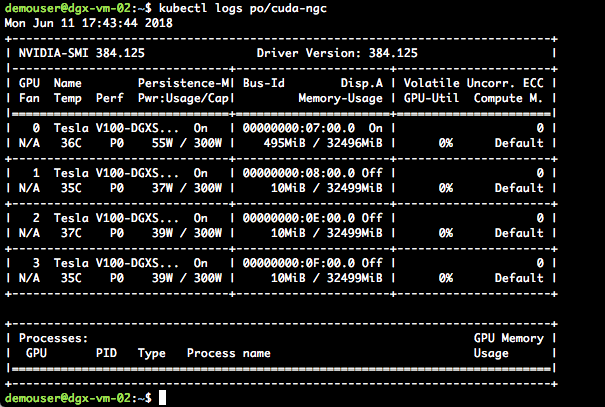
Now if we check the pod logs we should see the “nvidia-smi” output. Issue the following:
kubectl logs <your-pod-name>
You should see output similar to that shown in figure 9:
Next Steps
You now have a functional Kubernetes environment which allows you to test and develop a deeper knowledge of using a GPU enabled Kubernetes installation. Consider installing Kubernetes Web UI (Dashboard). Kubernetes also has monitoring tools that can be leveraged; for more information, see Tools for Monitoring Compute, Storage, and Network Resources. Udemy has a Learn DevOps: The Complete Kubernetes Course that is a great place to start learning more about Kubernetes.
Here are some additional useful links: Kubernetes on NVIDIA GPUs Installation Guide NVIDIA device plugin for Kubernetes Upgrading to the NVIDIA Container Runtime for Docker Schedule GPUs If you are on a DGX Station, consider updating as per DGX OS Desktop v3.1.6 Release Notification, or for DGX-1 refer to DGX OS Server v2.1.3 and v3.1.6 Release Notification.