Leveraging the Power of GPUs with CuPy in Python
Whether you're doing machine learning, scientific computing, or working with huge datasets, CuPy is an absolute game-changer.

Image by Author
What is CuPy?
CuPy is a Python library that is compatible with NumPy and SciPy arrays, designed for GPU-accelerated computing. By replacing NumPy with CuPy syntax, you can run your code on NVIDIA CUDA or AMD ROCm platforms. This allows you to perform array-related tasks using GPU acceleration, which results in faster processing of larger arrays.
By swapping out just a few lines of code, you can take advantage of the massive parallel processing power of GPUs to significantly speed up array operations like indexing, normalization, and matrix multiplication.
CuPy also enables access to low-level CUDA features. It allows passing of ndarrays to existing CUDA C/C++ programs using RawKernels, streamlines performance with Streams, and enables direct calling of CUDA Runtime APIs.
Installing CuPy
You can install CuPy using pip, but before that you have to find out the right CUDA version using the command below.
!nvcc --version
nvcc: NVIDIA (R) Cuda compiler driver
Copyright (c) 2005-2022 NVIDIA Corporation
Built on Wed_Sep_21_10:33:58_PDT_2022
Cuda compilation tools, release 11.8, V11.8.89
Build cuda_11.8.r11.8/compiler.31833905_0
It seems that the current version of Google Colab is using CUDA version 11.8. Therefore, we will proceed to install the cupy-cuda11x version.
If you are running on an older CUDA version, I have provided a table below to help you determine the appropriate CuPy package to install.
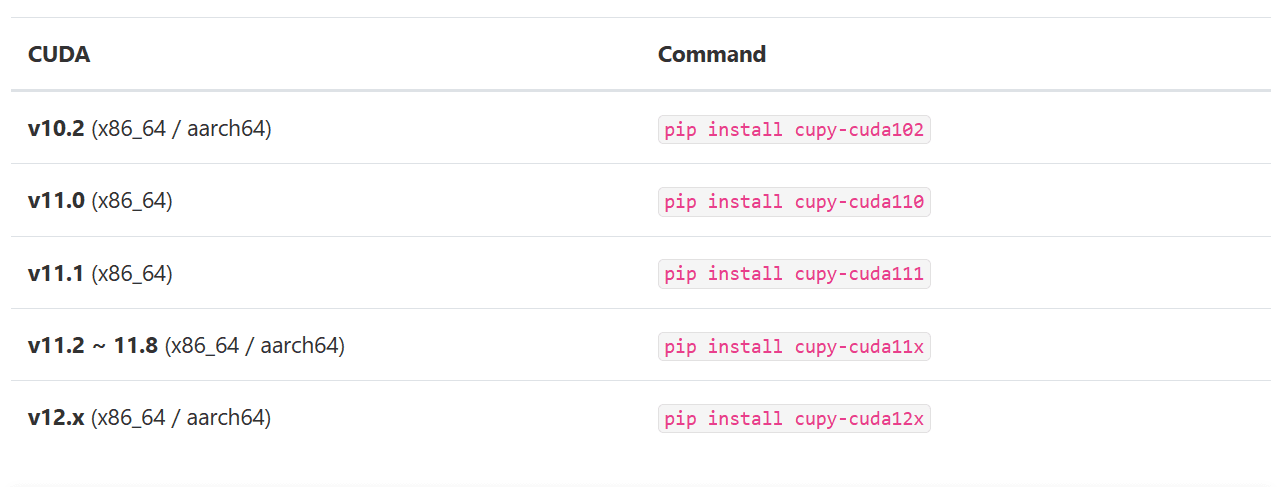
Image from CuPy 12.2.0
After selecting the right version, we will install the Python package using pip.
pip install cupy-cuda11x
You can also use the conda command to automatically detect and install the correct version of the CuPy package if you have Anaconda installed.
conda install -c conda-forge cupy
Basics of CuPy
In this section, we will compare the syntax of CuPy with Numpy and they are 95% similar. Instead of using np you will be replacing it with cp.
We will first create a NumPy and CuPy array using the Python list. After that, we will calculate the norm of the vector.
import cupy as cp
import numpy as np

x = [3, 4, 5]

x_np = np.array(x)
x_cp = cp.array(x)

l2_np = np.linalg.norm(x_np)
l2_cp = cp.linalg.norm(x_cp)

print("Numpy: ", l2_np)
print("Cupy: ", l2_cp)
As we can see, we got similar results.
Numpy:  7.0710678118654755
Cupy:  7.0710678118654755
To convert a NumPy to CuPy array, you can simply use cp.asarray(X).
x_array = np.array([10, 22, 30])
x_cp_array = cp.asarray(x_array)
type(x_cp_array)
cupy.ndarray
Or, use .get(), to convert CuPy to Numpy array.
x_np_array = x_cp_array.get()
type(x_np_array)
numpy.ndarray
Performance Comparison
In this section, we will be comparing the performance of NumPy and CuPy.
We will use time.time() to time the code execution time. Then, we will create a 3D NumPy array and perform some mathematical functions.
import time

# NumPy and CPU Runtime
s = time.time()
x_cpu = np.ones((1000, 100, 1000))
np_result = np.sqrt(np.sum(x_cpu**2, axis=-1))
e = time.time()
np_time = e - s
print("Time consumed by NumPy: ", np_time)
Time consumed by NumPy: 0.5474584102630615
Similarly, we will create a 3D CuPy array, perform mathematical operations, and time it for performance.
# CuPy and GPU Runtime
s = time.time()
x_gpu = cp.ones((1000, 100, 1000))
cp_result = cp.sqrt(cp.sum(x_gpu**2, axis=-1))
e = time.time()
cp_time = e - s
print("\nTime consumed by CuPy: ", cp_time)
Time consumed by CuPy: 0.001028299331665039
To calculate the difference, we will divide NumPy time with CuPy time and It seems like we got above 500X performance boost while using CuPy.
diff = np_time/cp_time
print(f'\nCuPy is {diff: .2f} X time faster than NumPy')
CuPy is 532.39 X time faster than NumPy
Note: To achieve better results, it is recommended to conduct a few warm-up runs to minimize timing fluctuations.
Beyond its speed advantage, CuPy offers superior multi-GPU support, enabling harnessing of collective power of multiple GPUs.
Also, you can check out my Colab notebook, if you want to compare the results.
Conclusion
In conclusion, CuPy provides a simple way to accelerate NumPy code on NVIDIA GPUs. By making just a few modifications to swap out NumPy for CuPy, you can experience order-of-magnitude speedups on array computations. This performance boost allows you to work with much larger datasets and models, enabling more advanced machine learning and scientific computing.
Resources
- Documentation: CuPy – NumPy & SciPy for GPU — CuPy 12.2.0 documentation
- GitHub: cupy/cupy
- Examples: cupy/examples
- API: API Reference
Abid Ali Awan (@1abidaliawan) is a certified data scientist professional who loves building machine learning models. Currently, he is focusing on content creation and writing technical blogs on machine learning and data science technologies. Abid holds a Master's degree in technology management and a bachelor's degree in telecommunication engineering. His vision is to build an AI product using a graph neural network for students struggling with mental illness.